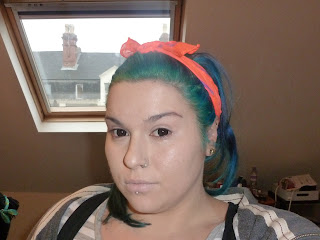
Monday 24 June 2013

Triumphant Return...

Hello Ladies and Gents

I am back... YAY!

*Deafening cheers full of pure elation echo around each and every continent*(Yes even Antarctica - those penguins can’t get enough of my shizzzz).

So I know I have been extremely neglectful of a blog that was in its infancy, but life got in the way. I was in my last year of university (just finished and am waiting with baited breath for my results) and it all just got a little manic and the blog just got left behind. But I am all done now and (until I find myself a job) - unemployed..... L

THIS GIRL IS FOR HIIIRRRRREEEEEEEEEE, THIS GIRL IS FOR HIIIRRRRRRRRREEEEEEEEEEEEEE.

(To the tune of Alicia Keys in case anyone was wondering).

So hopefully I will be updating this little beauty at least once a week from now on. Coming up will be a post about my first ever visit to IMATS (how terribly exciting!), probably lots of reviews on the delightful things I bought there, maybe some hair dye reviews and the usual mix of beauty posts (she says like this blog has been successfully putting out solid gold for years...).


Adios amigos xxx

Saturday 3 November 2012

Post Halloween Comedown.

Hey Guys,

I fail at life. Basically I was running so late for the party I went to that I didn't have time to photograph the stages, but I promise I will try to re-do it at some point with stages.

But here it is, my Halloween Costume - I was plucked out of a 40's/50's movie -


I will also re-do Chloe (Katherine Pierce/Katerina Petrova) in stages for a tutorial too - but here she is -


Sorry for being crap this week, I have been very busy. I hope you all had a great Halloween.

Much Love xxx

Tuesday 23 October 2012

Green Liner

Hey

Today is an everyday look, some vibrant neon green liner.


Face - 

Glominerals Liquid Foundation - Fair/Light mixed.
Maxfactor Natural Mineral Foundation - Natural.
Sleek Contour Kit - Light.
MUA Blush - Shade 2.

Eyes - 

HD Brows Palette.
Kryolan Neon Aquacolor Palette - The green.
Sleek Acid Palette - The green.
Illamasqua Cake Eyeliner - Mislead.
Yves Rocher Mascara - Noir.

Lips - 

Kiko Super Colour Lipgloss - 04 Portugal.

The Kryolan Palette is awesome, has great neon colours that I use for eye liners often, I'll show the other colours at some point.

Much Love xxx

Halloween Vampire look - Tutorial.

Hey you lovely people,

Got another look for the bestest damn holiday of the year!

Today its a Vampire look, I did two versions of the lips - a creepier more 'authentic' look and a more attractive vampy lip.

Here's the finished product...


And here is how we get there...

Firstly put in your creepy contacts, I did have some red ones, but I think they had shrunk because when I put them in they hurt like a bitch. So instead I put in some grey ones that I got for my Halloween costume (revealed soon I hope). You really want to do this before the make up, because afterwards would be a lot trickier and you run the risk of getting make up in your eye, or them watering so much you ruin the look.

So once that is done you put on very pale foundation, I used a mix of Glominerals Liquid in Fair and L'Oreal Infallible in Porcelain, this needs to cover your lips and be blended down the neck (and chest - depending on how much flesh you're showing), you should now look something like this -


Gorgeous I know.... :o/

Then use a matte black eye shadow (or pencil) to fill in your brows -


Now you might be tempted to leave it at this... because lets face it, its a good look, but please press on.

Now put a primer on your lid (I'm using Elf's), then a deep red shadow as a base all around the eye (Sugarpill - Love+) - 


Then on the inner corner and half of the lid put a slightly lighter shimmery red (Lime Crime - Siren), and a darker shimmery Rust/coppery/burgundy red to the outer half (Glamour Doll Eyes - Lovers Lane).


Then blend out the edges and the seam between the two colours, then add a black in a < (sideways V) shape on the outer corner from the lid to the socket line and blend well. Also take a little black under the lower lashes on the outer corner. Highlight your brow bone with a gold flecked white (Ruby and Millie Metallic Power in white).


Then line your eyes in black (Gel, Pen, Cake - whatever you fancy). Line your waterline with a red pencil.


After that take a little matte black and contour your face (the hollows of your cheeks, under your jawline and temples). Then using more of the black contour both sides of your nose, sweeping it under your eyes to create a gaunt ill look - blend all this out ridiculously well.


Now sweep a deep red blush across the tops of your cheek bones (don't take it all the way across your cheeks, we just want it to look like a mild flush of colour from a recent feed), blend this well and into your hair line (Sleek - Fenberry).

Now take a red lip stain (DuWop Twilight Venom) and put it only on the inside seal of your lips (where they meet), making sure to leave the outside pale. This maintains the illusion you are very pale/dead, but makes it look like you still have traces of someone else's blood on your lips.


Then put your false lashes on (Generic eBay purchase) and set the whole thing with a translucent powder (preferably white, preferably HD - mine was Elf's HD) and it should look something like this -


Then if you're me you'll have to pop a wig on, then some creature of the night appropriate clothes - 


Forgive all the crap on my mirror :-/

Pop your fangs in -


And this is the end result -


You can chose to have a different lip if you'd rather look more attractive than freshly fed, I forgot to photograph the stages, but its easy peasy -

First line your entire lip with a red pencil, then the outer two thirds with a burgundy pencil, then the outer third with a little black, blend these well. then repeat the process with the same coloured lipsticks (all matte looks the best in my opinion, but if you want glossy, go for it!). I used Ruby and Millie 420M red in the centre, Kate by Rimmel No.7 and a touch of Sleek Cranberry on outer thirds and Mac Black Knight on the very outer corners.

Then it looks like this -


Then just take loads of pictures and put lots of cool vampy effects on them, like so -


I hope you enjoyed this mammoth post, sorry about all the photos where I have my gob open, I was trying to get the fangs in shot, but they weren't big enough.

Let me know if you try it out, doesn't have to be for Halloween, because I'd actually where this out :-)

Much Love xxxx

New Hair...

Hey Guys,

Just a quick one this afternoon (going to try and get my Halloween Vampire look up this eve).

So I've gone from this...


To this...


So yeah, I like it, it's lightened a little since that picture, more of a turquoise/teal blend. I'm sure you'll see it a lot more in new posts.

Much Love xxx

Monday 22 October 2012

Pink Gradient With Glitter - Nail Tutorial.

Hi

Today I'm showing you how to do this nail look -


This is probably common sense, but just in case - let your nails dry between each step/coat.

Start with clean, well kept nails (I may do a step by step on how I prepare mine in the future, if anyone is interested). Then apply a basecoat, I'm using Orly's Nail Defense, then a coat of a light translucent pink (the kind used for French manicures) I'm using Kiko 207 French Pink. If you have nice healthy nails you could skip this part (as I did with the green version at the end of the post), but if you paint your nails often and they are a little bit stained, this step evens out the colour.


Then take a damp make up sponge - 


...and paint a little of the dark pink polish (or whatever colour you like really) onto it and sponge it on to the top half of the nails.


Repeat that step again on the top third of the nails - 


You can repeat that step till you get your desired effect (or cheat like me and then paint on the nail tip). Till they look something like this - 


Then take your glitter polish, I am using NYX Super Funk and apply (I used two coats, but I suppose it depends on the polish you're using and the glitter density). Try to spread the glitter out so you have a good coverage, then finish with top coat, I used Seche Vite. They should now look something like this - 


And here is the stuff I used - 


This is the look in green, using Orly's Fresh and Nyx Enchanted Forest (Forgive the pictures, they were taken on my phone) - 


Hope you found this helpful and you enjoy the results. I'll be posting new colours and occasionally some funky nail looks, but if you want lots more, check out my friend Jodi's Blog - 

http://omfgyournails.blogspot.co.uk/ - she is great and spends far more money on a greater range of polishes than I.

Coming up soon, another Halloween look, here's a hint - 


Much Love xx


Sunday 21 October 2012

Chinchilla.

Hey Guys,

An every day look for you today, featuring lime Crime's 'Chinchilla' lipstick. It mights be a little too unusual for some,  but I love it. they describe it as 'Medium grey with lavender undertones.' Its sort of between Grey and Lilac - not for everybody and a tricky one to pair with eye make up. I went for a soft pink and purple with black eye liner.


Face - 

Glominerals Liquid Foundation - Fair/Light mixed.
Maxfactor Natural Mineral Foundation - Natural.
Sleek Contour Kit - Light.
MUA Blush - Shade 4.

Eyes - 

Beauty UK Palette - No.6 - The pale pink and the purple.
MUA Matte Eye shadow - Shade 16.
Illamasqua Eye Liner Cake - Mislead.
MUA Eye Liner Pencil - White.

Eyebrows - 

HD Brow Palette. 

Lips - 

Lime Crime Chinchilla.

Hope you enjoyed.

New hair will be revealed soon, can you guess what colour it is?


Much Love xxx